If you're going to manage a bunch of WordPress sites, you have two main roads you can go down: a WordPress Multisite network or a multi-install setup. The first option is great for centralizing sites that are all part of the same family or brand. The second gives you complete isolation, which is perfect for separate client projects.
Making this call is a big deal. It's the foundation for everything else—your security, how you scale, and what your day-to-day work looks like.
Choosing Your WordPress Management Architecture
Before you even think about slick updates or automated backups, you need to nail down the fundamental structure for your portfolio of websites. This isn't just a technical choice; it's a strategic one that will define your workflow for years. Get it wrong, and you're signing up for security headaches, performance issues, and countless hours lost to clunky workarounds.
With WordPress powering an incredible 43.1% of all websites, the need for smart management has never been greater. If you're a freelancer or agency, you probably know the feeling of juggling a dozen or more client sites, each with its own quirks. It can get overwhelming fast if you don't have a solid plan.
What is WordPress Multisite, Anyway?
WordPress Multisite lets you run a whole network of websites from a single WordPress installation. Think of it as one engine powering multiple cars. All the sites share the same core files, database, themes, and plugins. As the "Super Admin," you can install a plugin once and activate it across the entire network, making updates a breeze.
This setup is ideal for a connected group of sites, like:
- A university with separate sites for each department.
- A company with different blogs for its various product lines.
- A publisher running a network of blogs on related topics.
The main selling point is centralized administration. You log in once to manage everything. But this shared environment is also its greatest weakness.
A security breach on one site can domino across the entire network. The same goes for performance problems. Plus, not every plugin plays nicely with Multisite, which can really limit your options.
The Case for a Multi-Install Setup
The alternative is what I use and recommend for almost all client work: a multi-install setup. Each WordPress site is its own separate installation with its own database, its own files, and its own slice of server resources. It might sound like more upfront work, but the isolation and security it provides are non-negotiable.
If one client's site gets hacked, the others are safely firewalled off. This is the gold standard for agencies and freelancers managing websites for different clients. Each site is a self-contained unit, which makes client handoffs clean and simple—no need to surgically remove a site from a tangled network. For a deeper dive into the pros and cons, this guide offers some great perspective on your overall Multi WordPress Site Strategy.
So, does this mean you're stuck logging into a dozen different places? Not at all. Modern control panels like WPJack have completely changed the game. You get a single dashboard to view all your separate installations, run bulk updates, and handle backups, all without giving up that critical security isolation. It’s the best of both worlds: centralized control with individual site integrity.
This is the path we'll be focusing on for building a management system that's scalable, secure, and professional.
WordPress Multisite vs Multi-Install: A Head-to-Head Comparison
To make the choice crystal clear, let's break down the critical differences between a WordPress Multisite network and a multi-install setup. This table should help you figure out which architecture is the right fit for your needs.
| Factor | WordPress Multisite | Multi-Install (with a Control Panel) | Best For |
|---|---|---|---|
| Administration | Centralized. One dashboard for all sites. Updates are applied network-wide. | Centralized via control panel (like WPJack), but each site is independent. | Multisite for simplicity on related sites; Multi-install for flexible control. |
| Security | Shared risk. A vulnerability on one site can impact the entire network. | Isolated. A breach on one site does not affect others. | Multi-install is the clear winner for security. |
| Performance | Shared resources. A traffic spike on one site can slow down all others. | Dedicated or isolated resources per site. Performance is self-contained. | Multi-install offers better, more predictable performance. |
| Plugin/Theme Compatibility | Limited. Not all plugins and themes are compatible with Multisite. | Unrestricted. Any standard WordPress plugin or theme will work. | Multi-install for maximum flexibility and choice. |
| Client Handoffs | Complex. Extracting a single site from the network can be difficult. | Simple. Just transfer the entire self-contained installation. | Multi-install is built for easy client and project management. |
| Scalability | Can be challenging to scale individual sites without affecting the network. | Easy. Scale resources for each site independently as needed. | Multi-install provides superior, granular scalability. |
Ultimately, while Multisite has its niche uses for tightly-coupled site networks, the multi-install approach offers the security, flexibility, and scalability that professional WordPress managers need, especially when handling client projects. It’s the foundation for a robust and resilient operation.
Building a Standardized Server Environment
If you’ve ever juggled WordPress sites across different server setups, you know it’s a fast track to chaos. One site is running on Apache, another on Nginx. One has an ancient PHP version riddled with security holes. This kind of inconsistency turns every routine update into a high-stakes gamble and makes troubleshooting a complete nightmare.
The most powerful strategy I’ve found for managing multiple WordPress sites is simple: standardization.
When you build every site on the same, high-performance foundation, you eliminate all the guesswork. This means you can develop, deploy, and maintain sites with speed and confidence. Your workflow shifts from putting out fires to proactive, predictable management.
The need for this kind of efficiency is exploding. With over 70% of new CMS websites expected to be built on WordPress by 2025 and more than 500 new sites launching every single day, scalable solutions are no longer a “nice to have.” Many agencies feel this pressure acutely, as a huge chunk of WordPress sites are still stuck on shared hosting, which just isn’t cut out for managing a portfolio of professional projects.
This decision tree helps visualize the core choice between a Multisite network and a Multi-Install setup based on what you’re trying to achieve.
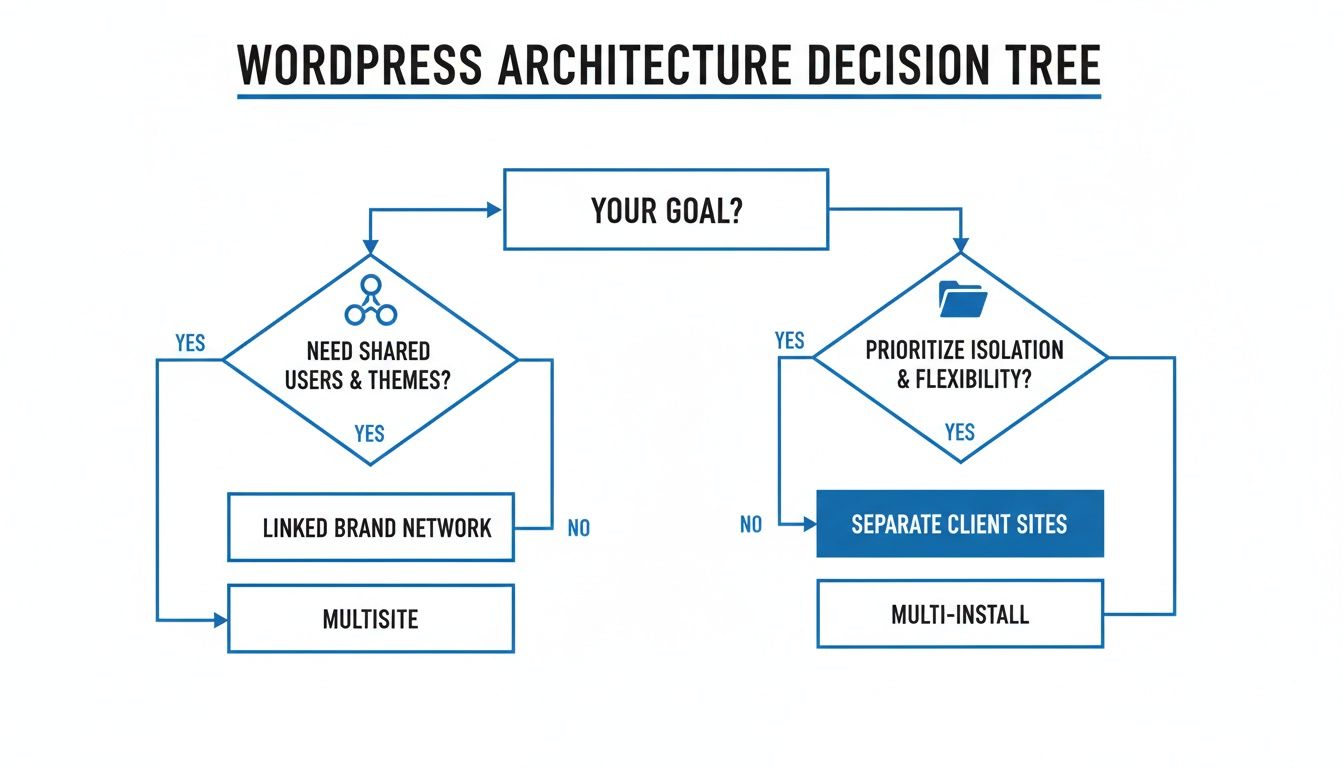
As you can see, if you’re building a network of linked brands that share resources, Multisite is a strong contender. But for managing separate client sites, the security and isolation of a multi-install architecture is almost always the right call.
Crafting the Ideal Server Stack
A modern, standardized server stack is your blueprint for success. Forget about winging it with cobbled-together solutions. A carefully chosen stack ensures every site you launch has the performance, security, and scalability it needs from day one.
Here’s a breakdown of a proven, high-performance stack I rely on:
- Nginx: As a web server, Nginx is a beast at handling tons of traffic with very little memory. It’s much faster than older options like Apache for serving static files, which gives you a real, tangible boost in site speed.
- Latest Stable PHP Version: This is non-negotiable. Running the most current, stable version of PHP gives you crucial security patches and major performance gains that directly impact how quickly your sites load.
- Robust Database (MariaDB or Percona): While WordPress works just fine with standard MySQL, derivatives like MariaDB or Percona often squeeze out better performance and scale more gracefully under heavy load.
- Redis Caching: Implementing an object cache like Redis is a game-changer. It stores frequently accessed data in memory, dramatically cutting down on database queries and letting WordPress retrieve information almost instantly.
This stack—Nginx, the latest PHP, a solid database, and Redis—isn’t just a random list. It’s a synergistic setup where each piece works together to create a fast, resilient, and secure environment tailor-made for WordPress.
Automating Server Provisioning
Manually configuring this stack every time you need a new server is both tedious and asking for trouble. One typo can bring everything down. This is where automation tools become your best friend.
Instead of spending hours typing commands, you can spin up a fully optimized server on providers like DigitalOcean, Linode, or Vultr in just a few minutes. If you want to see this in action, check out our guide on how to provision a web server and install WordPress the easy way.
This automated approach guarantees every server is a perfect clone of your ideal setup. It gives you a reliable and consistent foundation, making every new site launch predictable, fast, and secure right from the start.
Automating Core Tasks to Reclaim Your Time
Let’s be honest, the repetitive stuff is the biggest time-suck when you’re juggling multiple WordPress sites. Logging in and out of dashboards to run backups, update plugins, and perform maintenance isn’t just a grind; it’s a fast track to burnout and a recipe for costly mistakes. You can, and should, reclaim that time through smart automation.
This isn’t just about grabbing a few clever tools. It’s about building a dependable, “set it and forget it” system you can actually trust. This simple shift can turn hours of mind-numbing chores into a process that just works, freeing you up to focus on the work that actually grows your business.
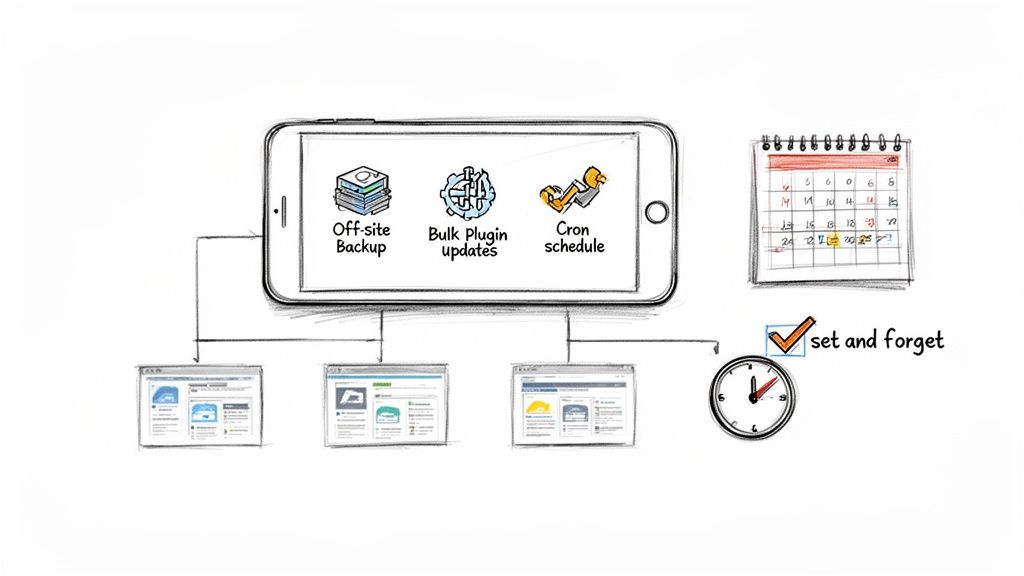
The Three Pillars of WordPress Automation
A solid automation strategy really comes down to three things: rock-solid off-site backups, safe bulk updates, and scheduled maintenance tasks. When you bring these together under a centralized dashboard, you get a single point of control over your entire portfolio of sites.
Let’s break down how to get each of these pieces in place.
Pillar 1: Reliable Automated Backups
A backup plan that isn’t automated and stored off-site isn’t much of a plan at all. Sure, on-server backups are a decent start, but they won’t do you any good if the whole server goes down in flames. Real peace of mind comes from knowing a complete copy of every site—files and database—is tucked away safely on a completely separate, secure server.
When you’re setting this up, here’s what to think about:
- Backup Frequency: For most client sites, a daily backup is the gold standard. If you’re managing a high-traffic e-commerce store with orders flying in, you might need to dial that up to every six or twelve hours.
- Retention Policy: How many restore points do you need? A 30-day retention policy is a great baseline, giving you a full month of history to fall back on.
- Off-site Storage: Always connect your backup system to a third-party storage provider. Think Amazon S3, Wasabi, or even Dropbox. That geographic separation is non-negotiable for real disaster recovery.
Modern control panels let you configure these settings once and apply them to all your sites. It’s a one-and-done setup that ensures every site is protected without you having to think about it again.
Pillar 2: Safe Bulk Plugin and Theme Updates
Updating plugins one-by-one is soul-crushing, especially when you have 20 or more websites. The nagging fear that a bad update will break something often leads to putting it off, which is a massive security risk. The trick is to build a system for safe bulk updates.
This is about more than just hitting an “Update All” button and hoping for the best. A professional approach involves things like visual regression testing or at least pre-update health checks. Some of the more advanced systems will even take a snapshot of the site, run the update, check for visual changes or errors, and automatically roll back if it detects a problem.
I once lost an entire weekend manually fixing sites after a popular plugin pushed out a faulty update. An automated system with rollback capabilities would have turned that crisis into a non-event. It’s a lesson you only want to learn once.
Pillar 3: Scheduled Cron Jobs for Maintenance
WordPress uses a system called WP-Cron for scheduled tasks like publishing posts or clearing caches. The problem is, WP-Cron only fires when someone actually visits the site, making it totally unreliable for low-traffic sites.
A far better way is to use a server-level cron job. This runs on a fixed schedule, no matter what, ensuring your maintenance tasks happen like clockwork.
Here are some common tasks to automate:
- Database Optimization: Regularly cleaning up transient options and optimizing tables keeps the database lean and running fast.
- Cache Clearing: For sites with heavy caching, a periodic flush can prevent users from seeing stale content.
- Security Scans: Schedule regular malware and vulnerability scans to find threats before they become a problem.
By offloading these jobs to an automated schedule, you’re ensuring your sites stay healthy and performant without you ever lifting a finger. To really manage a large number of WordPress installs and get your time back, it’s essential to use powerful cloud infrastructure automation tools that can handle these routines at scale. And for agencies ready to level up, you can even set up a continuous delivery pipeline for incredibly smooth theme and plugin updates.
Proactive Security and Performance Monitoring
As your portfolio of WordPress sites grows, so does your attack surface. Every new site is another potential door for threats. You have to shift from a reactive, fire-fighting mode to a proactive stance when you manage multiple WordPress sites. This isn’t just about installing a security plugin and calling it a day; it’s about building layers of defense and having a clear view of your entire network’s health.
A proactive strategy doesn’t just secure your clients’ assets. It builds trust through reliability and saves you from those late-night emergency calls. It’s the difference between being a professional manager and a perpetual troubleshooter.
This approach is a one-two punch: automated security measures combined with centralized performance monitoring. It gives you a complete picture of your operations from a single dashboard.
Building Non-Negotiable Security Layers
Your first line of defense is creating a secure-by-default environment for every single site you launch. This means putting foundational security measures in place that are automated and applied consistently, leaving no room for human error or something slipping through the cracks.
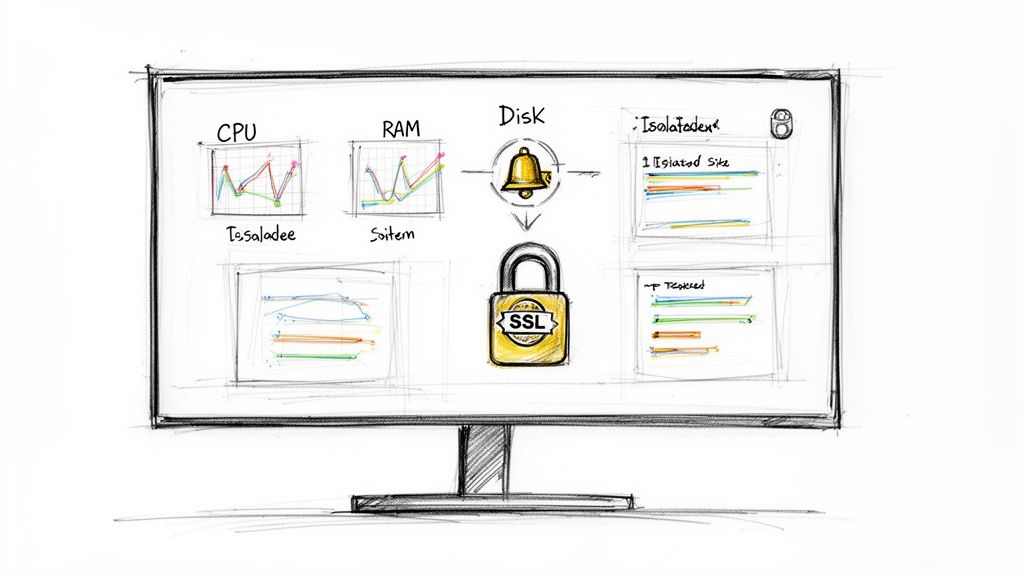
Two things are absolutely critical here: automated SSL issuance and strict site-level isolation.
Automated SSL Certificate Management
In the past, managing SSL certificates was a manual, often expensive chore. Today, it’s a non-negotiable, automated process. Every site you manage must have HTTPS enabled—not just for the SEO bump, but as a basic standard of security and professionalism.
Modern control panels like WPJack integrate with services like Let’s Encrypt to provide free, lifetime SSL certificates that are issued and renewed automatically. This “set it and forget it” approach means you never have to worry about renewal dates or browser security warnings again.
Site-Level Isolation
This is the single most important security principle in a multi-install setup. By making sure each WordPress site operates in its own sandboxed environment, you prevent cross-contamination. If one site gets compromised because of a vulnerable plugin, the breach is contained and can’t spread to your other client sites on the same server.
Think of it like having watertight compartments on a ship. A leak in one section doesn’t sink the entire vessel. This isolation is a core benefit of the multi-install architecture and a crucial selling point for clients who value security.
Centralized Performance and Health Monitoring
Once your security foundation is solid, the next step is getting a handle on the health and performance of your servers and websites. Trying to monitor these metrics by logging into individual servers or juggling a bunch of different tools is a recipe for disaster. It’s inefficient and creates blind spots.
A centralized dashboard is the only scalable way to keep an eye on everything at once. It pulls key metrics into one place, letting you spot trends, identify potential issues, and act before a minor problem becomes a major outage.
Key metrics to watch from your central dashboard include:
- Server CPU Usage: A sustained spike in CPU can point to a poorly optimized plugin, a sudden traffic surge, or even malicious activity.
- RAM Consumption: Monitoring memory usage helps you understand if your servers are properly sized for the work they’re doing.
- Disk Space: Running out of disk space can bring a server to a grinding halt. Proactive alerts for disk usage are a must-have to prevent this.
Unifying Your Log Reviews
Server and application logs are a goldmine of information for troubleshooting and security forensics. But let’s be honest, wading through raw log files on the command line for multiple sites is a nightmare. A good management tool brings all these logs together and makes them searchable from your dashboard.
Instead of SSHing into a server, you can just select a site and view its Nginx access and error logs in a clean, readable format. This dramatically speeds up the process of diagnosing issues like 404 errors, plugin conflicts, or spotting suspicious IP addresses probing your sites. This unified view turns chaotic log files into a real diagnostic tool, making your day-to-day work faster and much more effective.
Streamlining Team and Client Access
As your portfolio of sites gets bigger, so does the administrative headache of managing who has access to what. Juggling dozens of logins for your team and clients isn’t just a pain; it’s a massive security hole waiting to be exploited. One leaked password could put multiple sites at risk. The only sane way to manage this is to build a clean, scalable framework for user access from the start.
This is all about moving past shared logins and creating a system where everyone—from your top developers to content editors and the clients themselves—gets precisely the permissions they need, and not a single permission more. It’s how you build a professional workflow that keeps your servers safe while letting everyone collaborate without friction.
Implementing Role-Based Access Control
The principle of least privilege is your absolute best friend here. The idea is simple: a user should only have the ability to access what’s essential for their job. WordPress’s built-in user roles are a fantastic starting point for this.
- Administrator: Has the keys to the kingdom. Keep this role for yourself and maybe a trusted senior team member. Never, ever give a client full admin access unless you’re handing over the project for good.
- Editor: Can publish and manage posts, including posts from other users. This is perfect for a lead content manager or a client who needs to oversee everything being published.
- Author: Can publish and manage their own posts. Great for freelance writers or team members who own a specific content vertical.
- Contributor: Can write and manage their own posts but can’t hit the publish button. This is a super safe role for guest bloggers or junior team members because it forces an editor to review their work before it goes live.
By being thoughtful about assigning these roles, you slash the risk of someone accidentally breaking something or causing trouble. A client with an Editor role can’t deactivate a critical plugin, and a Contributor can’t push unapproved content live.
Your goal is to make it impossible for someone to break something they shouldn’t be touching in the first place. This simple discipline saves you from countless support tickets and those stressful “who did this?” conversations down the road.
Solving the SFTP Access Dilemma
One of the biggest security nightmares has always been managing SFTP (Secure File Transfer Protocol) access. In the old days, giving a developer file access often meant handing over credentials that could see the entire server, including every other client site on it. That’s a completely unacceptable risk.
Thankfully, modern control panels like WPJack have solved this beautifully by providing isolated, per-site SFTP credentials. When you spin up a new site, the system automatically generates a unique SFTP user that is “jailed” to that specific site’s directory.
This approach is a game-changer:
- Total Isolation: The user for
client-a.comhas zero access to or even visibility of the files forclient-b.com, even if they’re on the same server. - No Root Exposure: You never have to share your server’s root password. This keeps your core infrastructure completely locked down from everyone.
- Easy Revocation: When a project is done or a freelancer’s contract ends, you just delete their per-site user. No one else is affected.
This creates a workflow that’s clean, secure, and professional. You can confidently give a freelance dev file access to a single project, knowing they’re completely sandboxed. You can also give a client their site’s credentials for a final handoff, empowering them without exposing your other work. This kind of granular control isn’t a luxury; it’s essential for managing multiple WordPress sites securely.
Achieving Hosting Flexibility with a Multi-Cloud Strategy
Putting all your faith in a single cloud provider might feel simple at first, but it quietly builds a dangerous dependency called vendor lock-in. Think about it: what’s your plan if their prices suddenly skyrocket, or a massive network outage knocks your client sites offline for hours?
Real freedom comes from building an infrastructure that isn’t chained to one company. This gives you the power to pick and choose the best provider for any given job, any time.
That’s the whole idea behind a multi-cloud strategy. It’s about setting up a system where you can manage servers from different providers—like DigitalOcean, Linode, Hetzner, and Vultr—all from one place. This approach turns hosting into a commodity, letting you move sites to wherever the performance is best and the pricing is sharpest.
Why Vendor Lock-In Is a Silent Business Killer
Placing all your client sites with one host feels safe, until the day it isn’t. An unexpected price hike can completely wreck your profit margins on managed hosting packages. A sudden drop in server performance or a decline in support quality can do serious damage to your agency’s reputation.
A multi-cloud setup puts you firmly back in the driver’s seat. It just makes sense from a business perspective.
- Cost Savings: You can spin up servers with whoever is offering the best price-to-performance ratio for a specific project. No more overpaying.
- Better Performance: Different providers have stronger networks in different parts of the world. You can host a client’s site on a server that’s physically closer to their audience, which means lower latency and a faster site.
- Risk Management: If one provider has a major outage (and they all do, eventually), you can quickly move critical sites to another host and minimize downtime.
This strategy is a cornerstone of professionally managing multiple WordPress sites at scale. It changes your role from just being a customer to being a savvy infrastructure manager who’s always in control.
The Myth of Complex Cloud Migrations
The thought of moving a live WordPress site between different cloud providers can be pretty daunting. In the past, it was a messy, manual process full of risks. You had to juggle database exports, file transfers, and DNS updates, all while praying you didn’t cause a bunch of downtime.
Thankfully, those days are over. Modern management tools have made this process incredibly simple. Instead of a multi-day headache, you can now pull off a seamless migration with just a few clicks. A good control panel will do all the heavy lifting for you behind the scenes.
A well-executed migration should be a non-event. The goal is to move a complete, running WordPress site from a server in one data center to another—with a totally different provider—so smoothly that your client never even knows it happened.
The process usually involves taking a full snapshot of the source site, transferring it to the new server, and automatically updating all the necessary configurations before you flip the DNS switch. If you’re new to this, it’s worth reading a detailed guide on how to migrate a WordPress site to a different host to get comfortable with the core steps.
With the right tools, you gain the ultimate freedom to adapt. This flexibility makes your business more resilient, cost-effective, and always ready to deliver the best possible performance for your clients—no matter which cloud provider you’re using today, or which one you switch to tomorrow.
Frequently Asked Questions
Even with the best game plan, you’re bound to have questions when managing a fleet of WordPress sites. I get asked these all the time by agencies and freelancers, so here are some straight answers to the most common ones.
What’s The Biggest Mistake People Make?
The most common trap I see is the failure to standardize. Far too many people treat each site like its own little island—different hosts, different plugin stacks, different update schedules. This feels manageable at first, but it quickly spirals into a mess of inefficiency and gaping security holes.
The only way out is to build a standardized workflow. This means using a consistent server stack, a core set of plugins you trust, and a central dashboard to see everything. This isn’t just about being organized; it’s about turning chaos into a predictable, scalable system that saves you countless hours on maintenance and troubleshooting.
Your goal isn’t just to manage sites. It’s to build a system where management is so smooth it becomes an afterthought. Standardization gets you there.
Is A Control Panel Actually Cheaper Than Doing It All Manually?
It’s tempting to think that avoiding a subscription fee saves you money, but managing servers by hand is almost always more expensive in the long run. Think about it: every hour you or a developer spends on server setup, security patches, fixing weird errors, or running backups is an hour you can’t bill to a client.
A modern control panel automates the tedious stuff that would take a developer hours to do. That flat subscription fee is usually a tiny fraction of a developer’s hourly rate. You get a huge return on that investment by freeing up your team to focus on what actually makes money: client work and growing the business.
How Should I Handle Client Billing For Hosting?
One of the most profitable moves you can make is to stop reselling hosting and start offering “Managed WordPress Hosting” as a premium service. It’s a simple formula: calculate your total server costs from a provider like DigitalOcean or Vultr, add the cost of your management tool, and then apply a healthy markup.
This immediately creates a reliable, recurring revenue stream. And because you’re using efficient tools to run everything from one place, your time commitment per client is incredibly low. This makes it one of the highest-margin services you can offer.
Stop juggling servers and start building a more profitable business. WPJack gives you a single dashboard to manage all your WordPress sites across any cloud provider, with automated backups, security, and updates built-in. Get started for free and see how simple it can be.
Free Tier includes 1 server and 2 sites.