
Hetzner is the best European cloud provider and it offers a better ratio of quality vs. price than other major providers like Google Cloud and AWS. When you compare it to any other cloud provider, you’ll see that Hetzner instances are very affordable. It’s super easy to install WordPress on Hetzner.
You’ll get a $20 credit for Hetzner if you sign up through my Hetzner link.
Get API token from Hetzner
When logged into the Hetzner Cloud, visit the Security page and open the API tokens tab.
On this page, you need to create an API token with read and write permissions. Copy it into a clipboard or somewhere to use later.
Provision new server with WPJack
Visit the Sign-up page of WPJack and create a new account. A credit card is not needed and the Free tier is enough.
In the top right corner, click on the user dropdown, choose Account, and the Cloud Providers tab.
On this page, paste your Hetzner API token, and your account will be connected.
After this, you’ll be redirected to the Server creation form. The provision takes up to 10 minutes and does not depend on WPJack.
In this same form, you can optionally create the first site.
That’s it; this was pretty short.
If you’re more of a video person, check out our guide on installing WordPress using WPJack.
Creating a new server for our WordPress without WPJack
In Step 1 you can choose a location; I’ll go with Helsinki.
In Step 2, go to the Apps tab and click on WordPress. At this stage you’ll see that the price of the server is increasing, that’s because by default they configured a more powerful instance for WordPress.
You can manually select a cheaper instance in Step 3 if it’s too much.
Other steps are optional, but I would suggest you set up an SSH key.
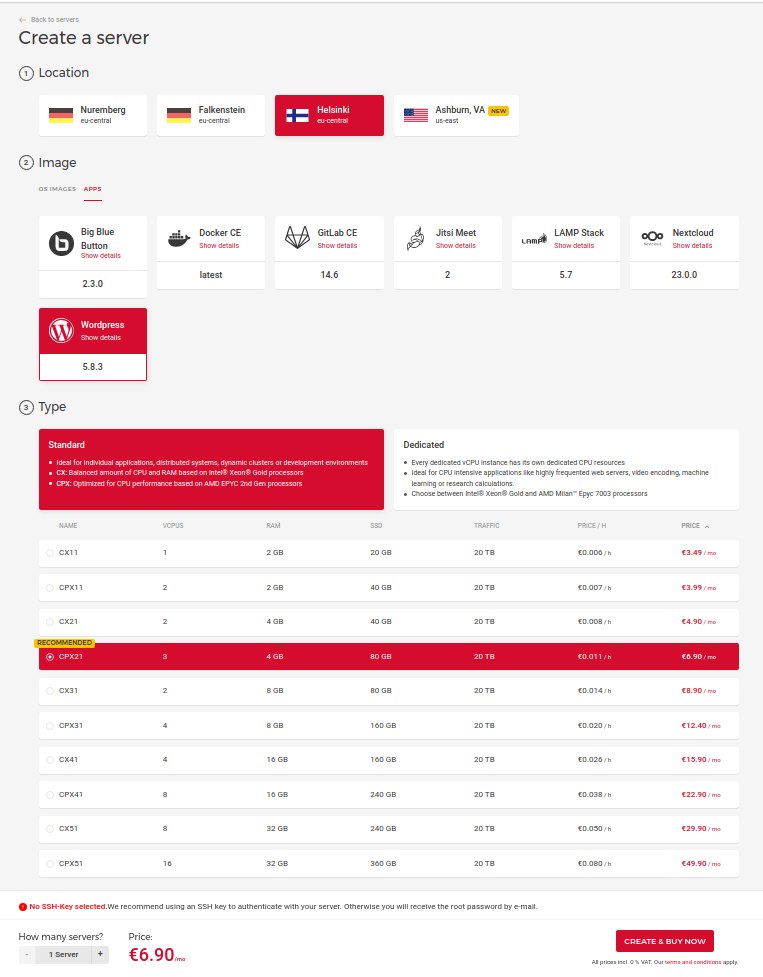
The cheapest server that can run WordPress is 3.49 euros a month.
Seems I am done here so I’ll click Create & Buy now.
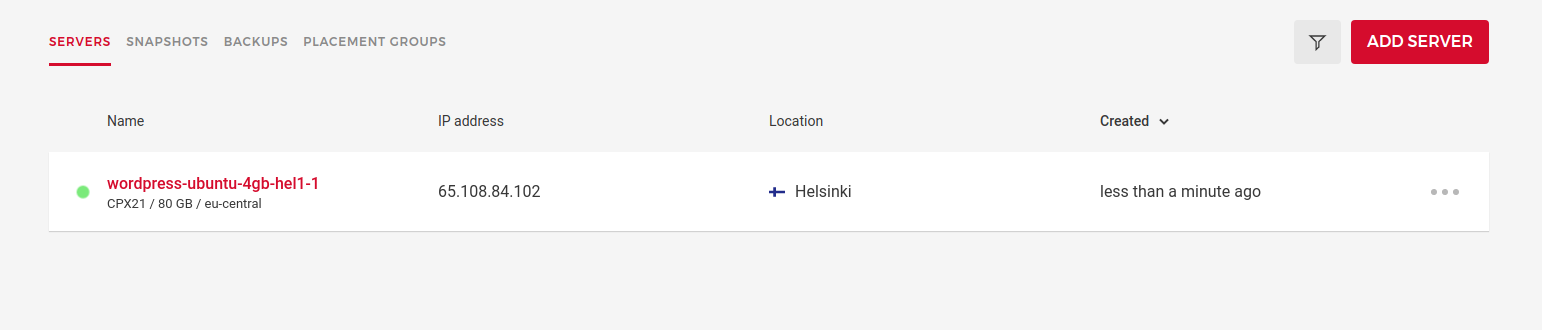
Server is ready
After only 10 seconds, my cloud instance is ready 🥳
This looks promising:
After I visited this IP address, I saw a Hetzner alert that said I needed to SSH into my instance and configure WordPress installation.
Also, this sentence is important inside that alert: If you want to use Let’s Encrypt, please go ahead and make sure the Domain exists before continuing.
This means for the first time since I am testing these 1-click installers, the SSL certificate will be automatically configured for my instance.
SSHing into the server
To SSH into my server, I used the command ssh [email protected] You need to replace this IP address with one from your instance. After executing the command terminal will ask you about the password, that’s the one you received in your inbox.
Immediately after login, I am asked this:
 ____________________________________________________________________
|                                                                    |
|   Welcome to the WordPress One-Click-App configuration.            |
|                                                                    |
|   In this process WordPress will be set up accordingly.            |
|   You only need to set your desired Domain and a few WordPress     |
|   details. You can also decide if Let's Encrypt should obtain      |
|   a valid SSL Certificate.                                         |
|   Please make sure your Domain exists first.                       |
|                                                                    |
|   Please enter the Domain in following pattern: your.example.com   |
|____________________________________________________________________|
Please enter you details to set up your new WordPress Instance.
Your Domain: hetzner.wpjack.com
Before entering your domain or subdomain, ensure you have a DNS A record pointing to the IP address of the newly created instance.
After this script asked me about my email address and asked for credentials for WordPress admin, I also confirmed that my domain was configured and that I wanted an SSL certificate issued.
The installation is complete and WordPress should be running at your Domain.
--- hetzner.wpjack.com ---

The Admin Panel can be accessed via
--- hetzner.wpjack.com/wp-admin ---
Seems that’s it. This was amazing.
Everything works as expected, and the SSL certificate is valid.
I could not recommend Hetzner enough for deploying WordPress; the experience of using their installer is supreme compared to other cloud providers I tested.
Hosting multiple WordPress sites on the same server
Hetzner WordPress installer is not built for this. It’s simply installing basic WordPress on the server and nothing else.
In order to add more sites to the same server, you would need to ssh into the server and take the sysadmin role.
The following steps are needed in order to host additional sites on the server:
- New Linux user with it’s home directory
- New virtual host web server configuration file for each site
- SSL installed
- File permissions configured correctly
- WordPress is installed in the defined folder and files uploaded
- New database
Doing this manually is not an optimal way. That’s why I created WPJack.
1-click WordPress installation on Hetzner Cloud
Recently, we launched our integration for Hetzner. Now, you can launch new Hetzner instances through the WPJack panel.
Check Hetzner integration details here.
Video: Install WordPress on Hetzner Cloud
I made a video tutorial on how you can install WordPress on Hetzner Cloud. It’ll take you under 5 minutes to complete everything.
Free Tier includes 1 server and 2 sites.